
How to Upload Financial Documents
Borrowers who do not use cloud-based accounting software or supported desktop apps like QuickBooks and Sage 50 Pro/Sage 50 Premium can share their financial information by uploading a Chart of Accounts document and a series of monthly Trial Balances. This page provides generic instructions and may depend on the software you are using.
The instructions below are for borrowers who use desktop-based software that are not QuickBooks Desktop or Sage 50 Pro/Sage 50 Premium.
If you are using QuickBooks Desktop or Sage 50 Pro/Premium, please follow these instructions instead: How to Export data from QuickBooks Desktop or Sage 50 Pro/Premium and How to Upload files to your portal
Not sure what type of software you have? Visit our Frequently Asked Questions to find out.
How to prepare your financial documents for upload
Note that the following step numbers may vary depending on your Lender but the step to look for is generally called “Upload Files”
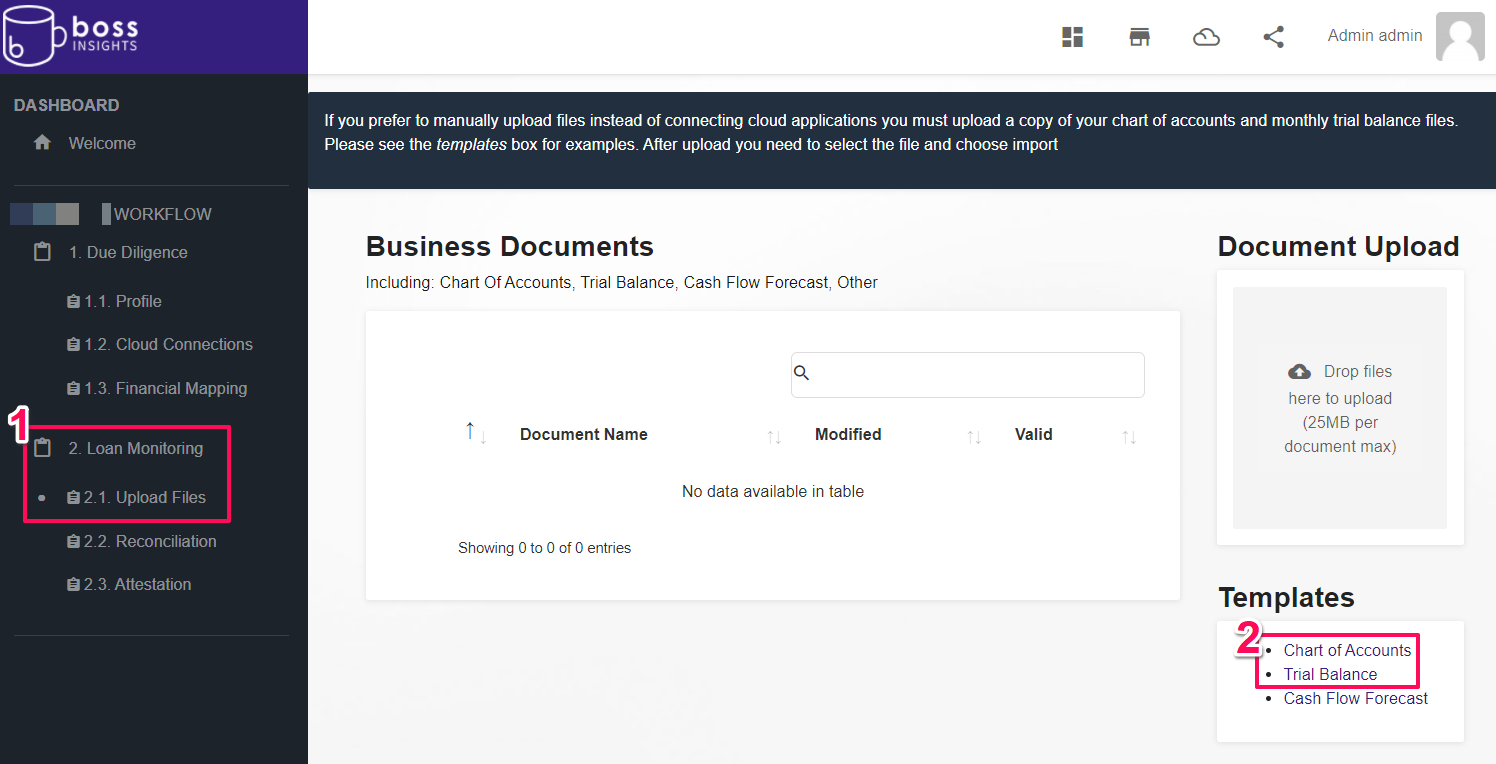
Log in to your account domain and click “2. Loan Monitoring” in the sidebar on the left. This will make the sub-steps appear. Click “2.1 Upload Files”. This will take you to the Business Documents page.
On the Business Documents page, there is a section on the right called “Templates”. This section contains links for sample CSV files for the listed financial documents. When you click on a document name, a download of that file should automatically begin. Click on “Chart of Accounts” and “Trial Balance” to download those 2 CSV files. The files are also available for download in the “File Downloads” section at the bottom of this guide.
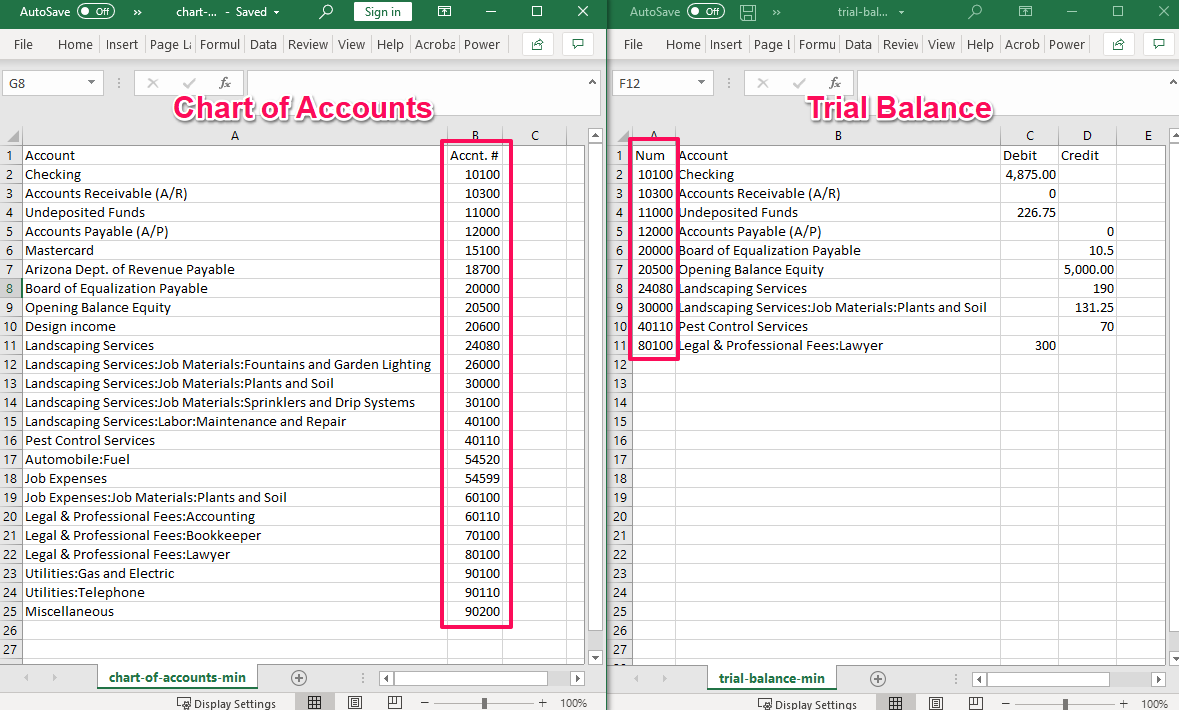
Open the CSV files in Excel or an alternative spreadsheet program. Replace the sample information with your information. You will only need one Chart of Accounts file, but you will need to prepare a separate Trial Balance file for each month you wish to share financial information for. Note: the account IDs in the “Num” column of your trial balances must exist in the “Accnt. #” column of your chart of accounts.
How to upload and import your files
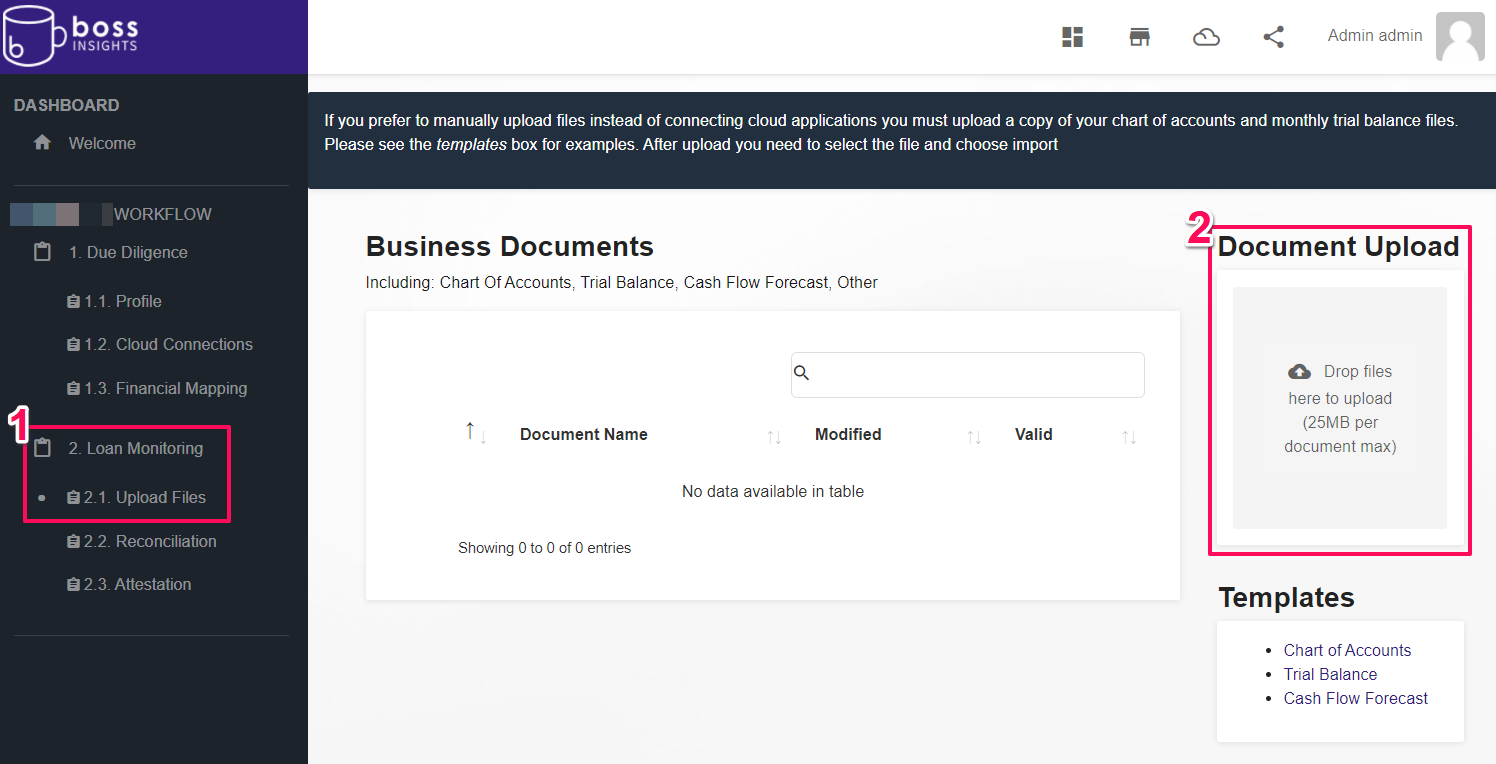
Log in to your account domain and click “2. Loan Monitoring” in the sidebar on the left. This will make the sub-steps appear. Click “2.1 Upload Files”. This will take you to the Business Documents page.
On the Business Documents page, there is a section on the right called “Document Upload”. You can click on this section to open the file explorer and select the documents you wish to upload. You can also drag and drop files into this section to upload them. Upload your Chart of Accounts and monthly Trial Balance CSV files using this section.
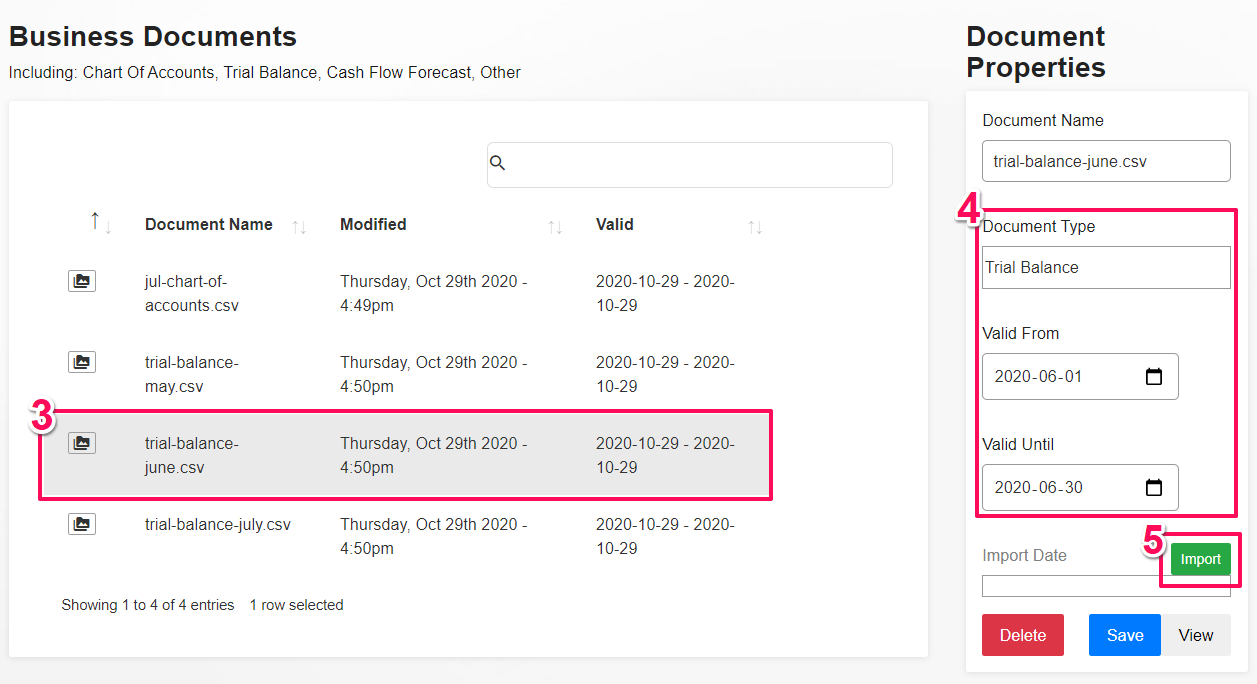
Uploaded documents will appear in the list on the left. Each file must now be imported, a process which will parse financial data from the files. Your chart of accounts must be imported before you import your trial balances. Click on a file in the list and the “Document Upload” section on the right will be replaced by a “Document Properties” section.
Edit the “Document Type” and “Valid From” and “Valid Until” dates in the “Document Properties” section. In the screenshot example, I have changed the document type of my June trial balance to “Trial Balance”, and I have set the dates to the first and last days of June.
If you have changed the “Document Type” appropriately, a green “Import” button will appear. Confirm that the document type and dates are correct, then click the “Import” button.
How to Map your imported Chart of Accounts
Note that the following step numbers may vary depending on your Lender but the step to look for is generally called “Financial Mapping”
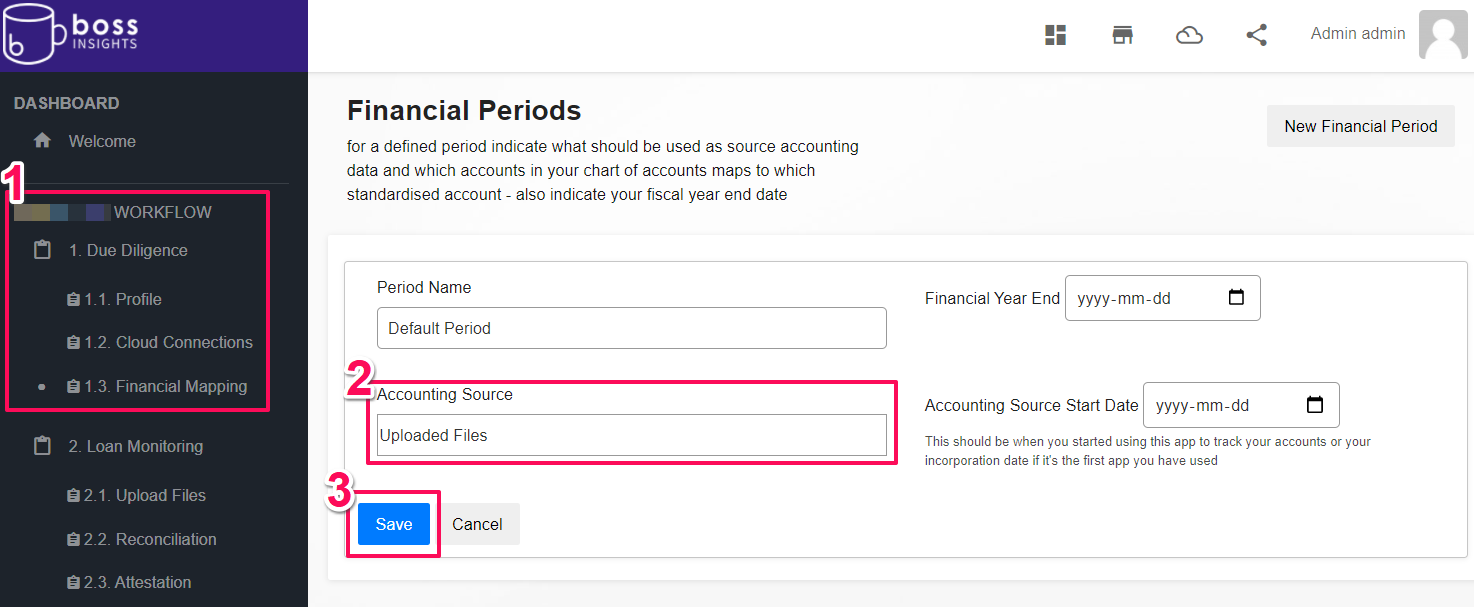
Log in to your Boss Insights domain and click “1. Due Diligence” in the sidebar on the left. This will make the sub-steps appear. Click “1.3 Financial Mapping”. This will take you to the Financial Periods page.
If you have not created a Financial Period on this page before, there will be a Default Period that you can edit. You can also create a new financial period using the button in the top right. For your imported chart of accounts file to be used for this Financial Period, “Accounting Source” must be set to “Uploaded Files”.
Fill out the other three fields. The “Accounting Source Start Date” should be at or before the start date of your earliest imported trial balance. Once you have filled out the fields, click “Save”.
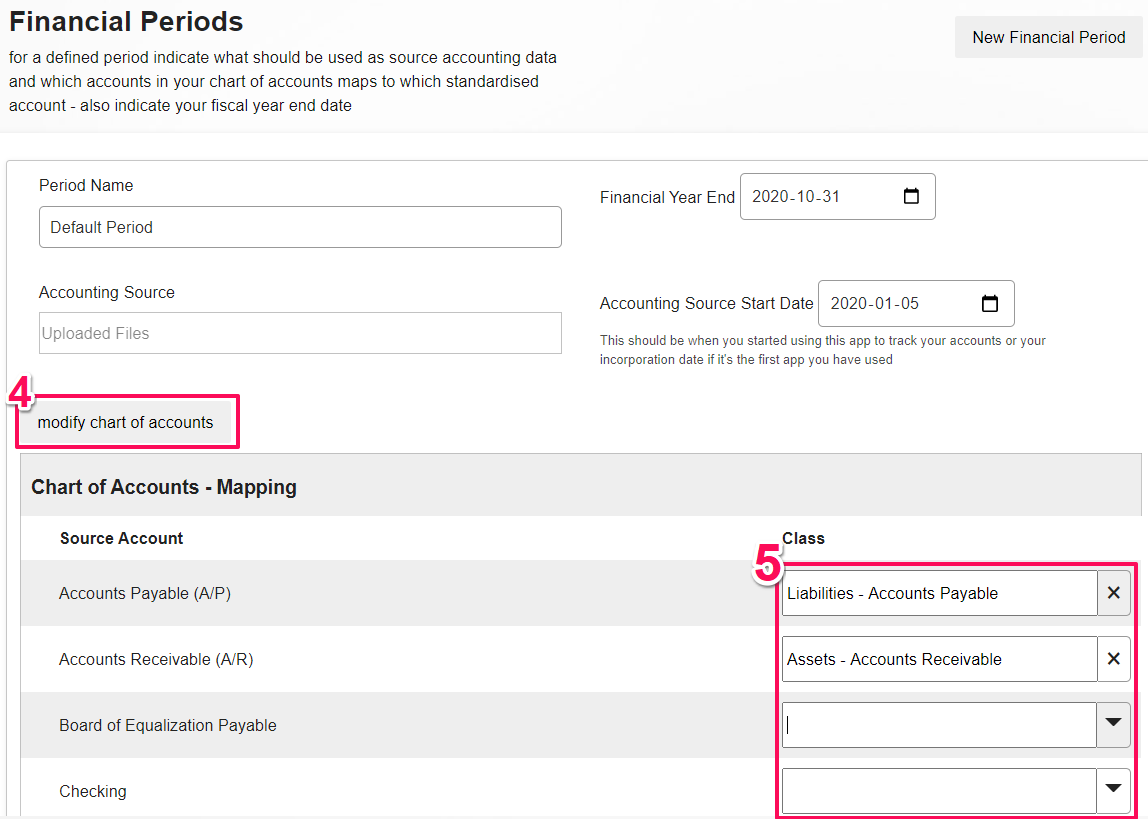
After you save there is a new button that says “modify chart of accounts”. Click on this button to show the “Chart of Accounts - Mapping” table. This table is used to map your chart of accounts to the Lender standard chart of accounts. The “Source Account” column on the left is populated by the accounts from your imported chart of accounts CSV file.
The “Class” column on the right is used to set which Lender account you want to map your Source Account to. You can use the dropdown arrow to select from our standard chart of accounts list, or you can type into the text input and you will be suggested accounts using auto-complete. Once you have mapped all accounts, click “Save” and you are finished! You have successfully shared your financial information with your Lender. Your Lender can now view your information on the “Company Insights” page of their Boss Insights domain.
File Downloads
The following blank templates can be used to prepare your own financial documents:
trial-balance-blank-template.csv chart-of-accounts-blank-template.csv
The following demo files can be used to test out the system with example data:
demo-trial-balance-september.csv demo-trial-balance-august.csv demo-trial-balance-july.csv demo-trial-balance-june.csv demo-trial-balance-may.csv demo-trial-balance-april(empty).csv demo-chart-of-accounts.csv